跟上ai潮流,随着人工智能技术的不断发展,ai绘画也不例外。现在可以使用stable-diffusion-webui来创作出各种惊艳的作品但是对于初次使用的人来说,安装和使用可能会有些困难。在本文中,我将为大家介绍ubuntu部署stable-diffusion-webui的方法和使用技巧,希望能够帮助大家更好地利用这一工具进行创作。
安装环境
- VMware虚拟机
- CPU:8 Core
- GPU:Tesla P40
- RAM:8G
- 系统:Ubuntu 22.04.1 LTS
- 用户:root
本次安装:
- Nvidia-driver
- Anaconda3
- Cuda 11.8
- PyTorch 2.0
- Xformers 0.17
- Stable-diffusion-webui
安装显卡驱动
确认是否存在显卡
输入命令
如果有显卡驱动(看到显卡型号功耗等)就可以跳过安装显卡驱动的部分
输入命令
nvidia-smi如果有显卡驱动(看到显卡型号功耗等)就可以跳过安装显卡驱动的部分
第一步:查询合适的显卡驱动
ubuntu-drivers devices正常输出输出
vendor   : NVIDIA Corporation
model    : 显卡型号
driver   : nvidia-driver-515 - distro non-free
driver   : nvidia-driver-515-server - distro non-free
driver   : nvidia-driver-525 - distro non-free recommended
driver   : nvidia-driver-525-server - distro non-free
...
会提示合适的显卡驱动版本,这次选择 nvidia-driver-525 进行安装,可以视情况选择不同的版本
可能出现的问题
1.执行命令后无反应
解决方法:输入命令
sudo add-apt-repository ppa:graphics-drivers/ppa
sudo apt-get update
2.Command 'ubuntu-drivers' not found
解决方法:按提示安装ubuntu-drivers即可
sudo apt install ubuntu-drivers-common第二步:安装驱动
输入:
sudo apt install nvidia-driver-xxxxxx可以视情况选择不同的版本,这次安装的是525
安装完成后重启系统并输入nvidia-smi验证安装,正确安装驱动后会显示以下信息
+-----------------------------------------------------------------------------+
| NVIDIA-SMI 525.85.05    Driver Version: 525.85.05    CUDA Version: 12.0     |
|-------------------------------+----------------------+----------------------+
| GPU  Name        Persistence-M| Bus-Id        Disp.A | Volatile Uncorr. ECC |
| Fan  Temp  Perf  Pwr:Usage/Cap|         Memory-Usage | GPU-Util  Compute M. |
|                               |                      |               MIG M. |
|===============================+======================+======================|
|   0  Tesla P40           Off  | 00000000:03:00.0 Off |                  Off |
| N/A   36C    P8    10W / 250W |      4MiB / 24576MiB |      0%      Default |
|                               |                      |                  N/A |
+-------------------------------+----------------------+----------------------+

+-----------------------------------------------------------------------------+
| Processes:                                                                  |
|  GPU   GI   CI        PID   Type   Process name                  GPU Memory |
|        ID   ID                                                   Usage      |
|=============================================================================|
|    0   N/A  N/A      1314      G   /usr/lib/xorg/Xorg                  4MiB |
+-----------------------------------------------------------------------------+
安装Cuda
全版本CUDA Toolkit Archive
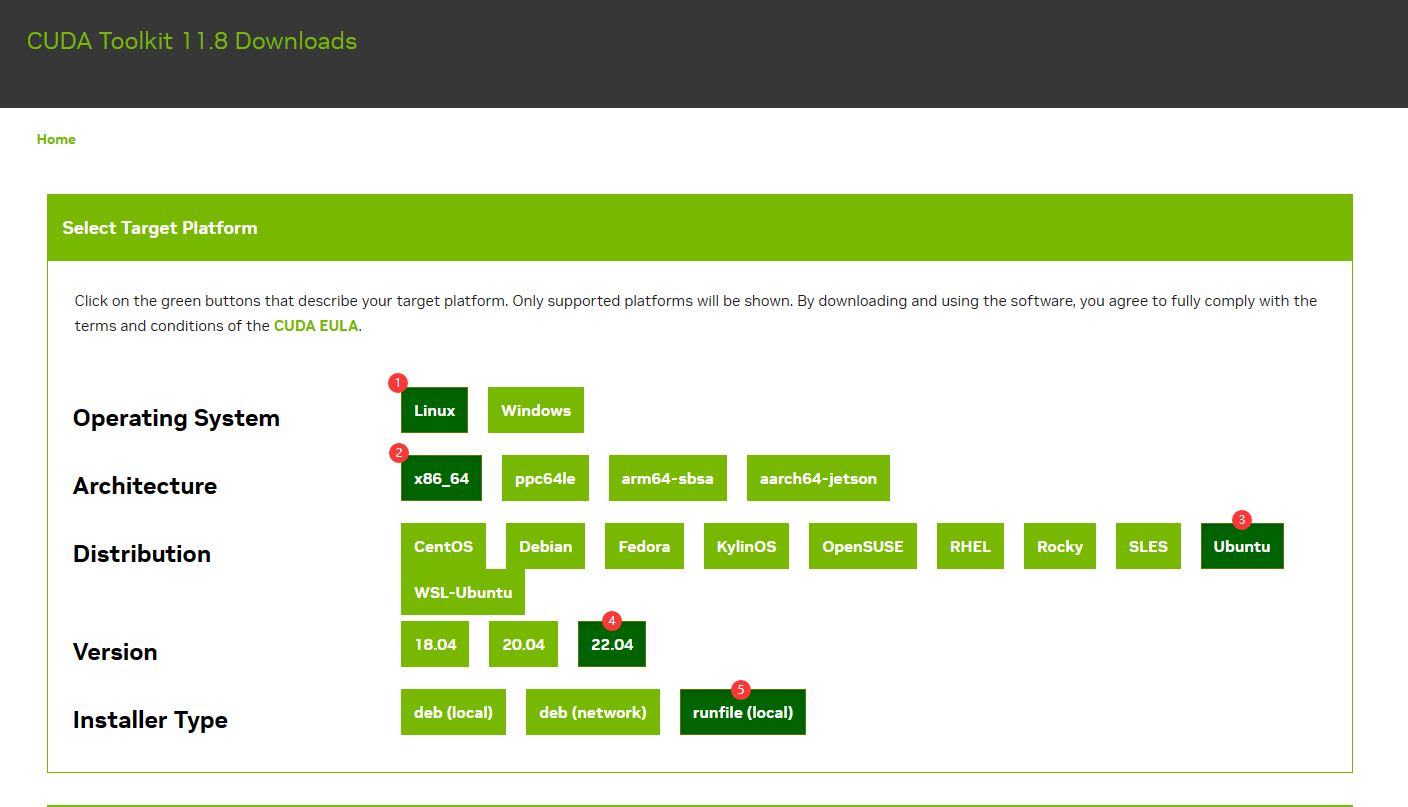
这次选CUDA Toolkit 11.8进行下载安装。
在服务器上执行对应命令安装CUDA
wget https://developer.download.nvidia.com/compute/cuda/11.8.0/local_installers/cuda_11.8.0_520.61.05_linux.run
sudo sh cuda_11.8.0_520.61.05_linux.run
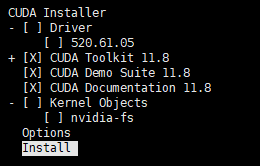
中途同意一下EULA,因为已经安装了显卡驱动,这里取消驱动的安装,只保留CUDA
等待安装完成即可
安装Anaconda
参考之前的Anaconda安装方法,安装conda环境
安装sd-webui
选择安装目录
创建一个sd-webui的目录
mkdir sd-webui
cd /sd-webui
创建conda虚拟环境
需要使用3.10版本的python,建议3.10.6以上(webui的api低于这个版本好像会出奇怪的问题)
conda create --name sdwebui_env python=3.10
中途按Y确认一下就行。
激活环境
conda activate sdwebui_env
查看python版本
python -V从github上拉取最新的sd-webui
git clone https://github.com/AUTOMATIC1111/stable-diffusion-webui.git进入webui目录
cd stable-diffusion-webui
配置git代理(可选)
\#设置git代理
\#取消git代理
\#设置git代理
git config --global http.https://github.com.proxy socks5://127.0.0.1:10808\#取消git代理
git config --global --unset http.proxy git config --global --unset https.proxy安装依赖
其实直接运行
但因为要选定pytorch2.0和xformers0.17版本所以先提前安装
python launch.py程序会自己安装对应的依赖但因为要选定pytorch2.0和xformers0.17版本所以先提前安装
换pip源
提前安装依赖,这样可以选pip源
清华大:https://pypi.tuna.tsinghua.edu.cn/simple/
中科大:https://pypi.mirrors.ustc.edu.cn/simple/
豆瓣源:https://pypi.doubanio.com/simple/
阿里源:http://mirrors.aliyun.com/pypi/simple/
默认源:https://pypi.org/simple/
全局设置pip源:pip config set global.index-url 源地址
临时设置pip源: 在 pip/pip3 命令最后面加上 -i 源地址
安装pytorch
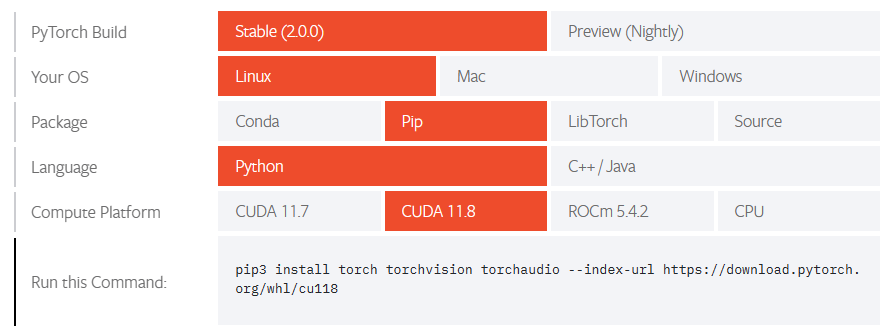
Pytorch官网选择对应版本的pytorch,这里选2.0(对应CUDA11.8)
pip install torch torchvision torchaudio --index-url https://download.pytorch.org/whl/cu118安装xformers(正常安装)
pip install xformers安装xformers(编译安装)
2023.03.17目前xformers还没有支持pytorch2.0,需要自己编译,耗时1个小时左右
pip install ninja
pip install -v -U git+https://github.com/facebookresearch/xformers.git@main#egg=xformers
安装其他依赖
pip install -r requirements_versions.txt --prefer-binary启动sd-webui
python launch.py --listen --port 8080 -xformers不出意外就能访问webui了
安装插件
非本机(127.0.0.1)访问webui的话,默认是装不了插件的,需要添加启动参数 --enable-insecure-extension-access
推荐一些插件:

